Monday, May 08, 2006
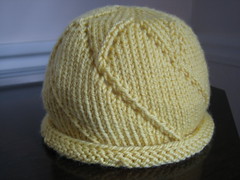
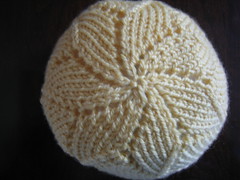
Star of the Day Hat
This pattern is dedicated to Mr. Etherknitter.


Note on Sizing: If you use U.S. size 4 needles (3.5mm) to obtain a gauge of 6 stitches per inch and otherwise follow the pattern exactly as written, the finished hat will fit a preemie or newborn.
Crown:
Cast 7 stitches onto one of the dpns. Distribute the stitches over 3 of the dpns (or 4 dpns if you are using a set with 5 needles) and join into the round, being careful not to twist the stitches. Place a marker to indicate the beginning of the round. Work the star pattern on the crown of the hat by following the instructions for Rnds 1-22, below. When you have a sufficient number of stitches, transfer them to the circular needle.
Rnd 1: *yo, k1; repeat from * to end of rnd
Rnd 2 and all even rnds: knit
Rnd 3: *yo, k2; repeat from * to end of rnd
Rnd 5: *yo, k3; repeat from * to end of rnd
Rnd 7: *yo, k4; repeat from * to end of rnd
Rnd 9: *yo, k5; repeat from * to end of rnd
Rnd 11: *yo, k6; repeat from * to end of rnd
Rnd 13: *yo, k1, yo, k4, k2tog; repeat from * to end of rnd
Rnd 15: *yo, k3, yo, k3, k2tog; repeat from * to end of rnd
Rnd 17: *yo, k5, yo, k2, k2tog; repeat from * to end of round
Rnd 19: *yo, k7, yo, k1, k2tog; repeat from * to end of round
Rnd 21: *yo, k9, yo, k2tog; repeat from * to end of round
Rnd 22: knit
You should now have 84 stitches. Make sure the beginning of the rnd is marked.
Sides:
Rnd 1: k11, yo, ssk, *k10, yo, ssk; repeat from * to end of rnd. Note: At the end of the rnd, it will be necessary to move the marker one stitch to the left to complete the ssk decrease. In other words, the beginning of the rnd will shift by one stitch each time you work Rnd 1.
Rnd 2: knit
Repeat Rnds 1 & 2 until the sides of the hat are approximately 3 inches long. End by working Rnd 2.
Bind off using an applied I-cord following the steps described below. Note: The sides of this hat are stretchy because of the lace pattern. In order to insure the bind off is not too tight, you will probably find it necessary to work the I-cord bind off with a needle one size larger.
step 1: cast 3 sts onto the right needle using the backward loop cast-on method
step 2: transfer the three sts from the right needle to the left needle
step 3: (using the larger needle) k2, ssk
Repeat steps 2 & 3 until you've bound off all the sts from the body of the hat. Bind off the remaining 3 sts and tidy up the join. Weave in any loose ends. Block lightly to stop the bottom edge from rolling and to open up the lace slightly. Or leave the hat unblocked and allow the bottom edge to curl.
copyright 2006, Susan Pierce Lawrence
This pattern is for your personal, non-commercial use only. You may not reproduce the pattern for distribution, sale, or any other purpose. Finished items made from this pattern may be donated to charity but they may not be sold under any circumstances.
Who's linking here?
|


- Size: Baby / 6-12 months (approx. 15-16" circumference)
- Yarn: 1 skein Gems Merino "Opal" 100g /225 yds; 100% superwash merino wool (one skein will make two hats)
- Needles: 1 set double-pointed needles (dpns) in U.S. size 5 (3.75mm), or size needed to obtain the correct gauge
1, 16" circular needle in the same size (or, you can work the entire hat on the dpns) - Gauge: 5.5 stitches per inch, measured in stockinette stitch knit in the round
Note on Sizing: If you use U.S. size 4 needles (3.5mm) to obtain a gauge of 6 stitches per inch and otherwise follow the pattern exactly as written, the finished hat will fit a preemie or newborn.
Crown:
Cast 7 stitches onto one of the dpns. Distribute the stitches over 3 of the dpns (or 4 dpns if you are using a set with 5 needles) and join into the round, being careful not to twist the stitches. Place a marker to indicate the beginning of the round. Work the star pattern on the crown of the hat by following the instructions for Rnds 1-22, below. When you have a sufficient number of stitches, transfer them to the circular needle.
Rnd 1: *yo, k1; repeat from * to end of rnd
Rnd 2 and all even rnds: knit
Rnd 3: *yo, k2; repeat from * to end of rnd
Rnd 5: *yo, k3; repeat from * to end of rnd
Rnd 7: *yo, k4; repeat from * to end of rnd
Rnd 9: *yo, k5; repeat from * to end of rnd
Rnd 11: *yo, k6; repeat from * to end of rnd
Rnd 13: *yo, k1, yo, k4, k2tog; repeat from * to end of rnd
Rnd 15: *yo, k3, yo, k3, k2tog; repeat from * to end of rnd
Rnd 17: *yo, k5, yo, k2, k2tog; repeat from * to end of round
Rnd 19: *yo, k7, yo, k1, k2tog; repeat from * to end of round
Rnd 21: *yo, k9, yo, k2tog; repeat from * to end of round
Rnd 22: knit
You should now have 84 stitches. Make sure the beginning of the rnd is marked.
Sides:
Rnd 1: k11, yo, ssk, *k10, yo, ssk; repeat from * to end of rnd. Note: At the end of the rnd, it will be necessary to move the marker one stitch to the left to complete the ssk decrease. In other words, the beginning of the rnd will shift by one stitch each time you work Rnd 1.
Rnd 2: knit
Repeat Rnds 1 & 2 until the sides of the hat are approximately 3 inches long. End by working Rnd 2.
Bind off using an applied I-cord following the steps described below. Note: The sides of this hat are stretchy because of the lace pattern. In order to insure the bind off is not too tight, you will probably find it necessary to work the I-cord bind off with a needle one size larger.
step 1: cast 3 sts onto the right needle using the backward loop cast-on method
step 2: transfer the three sts from the right needle to the left needle
step 3: (using the larger needle) k2, ssk
Repeat steps 2 & 3 until you've bound off all the sts from the body of the hat. Bind off the remaining 3 sts and tidy up the join. Weave in any loose ends. Block lightly to stop the bottom edge from rolling and to open up the lace slightly. Or leave the hat unblocked and allow the bottom edge to curl.
copyright 2006, Susan Pierce Lawrence
This pattern is for your personal, non-commercial use only. You may not reproduce the pattern for distribution, sale, or any other purpose. Finished items made from this pattern may be donated to charity but they may not be sold under any circumstances.
Who's linking here?


